BSNL FTTH Softphone Implementation Guide
1. Theory & Network Architecture
BSNL FTTH broadband connections bundle a landline voice service delivered via VoIP (Voice over IP) using SIP (Session Initiation Protocol). Since BSNL FTTH (Fiber To The Home) operates on a third-party model, each local area is managed by a franchise contractor rather than a direct BSNL employee. These technicians often lack deeper theoretical knowledge and simply follow standard procedures to set up an FTTH connection. While they routinely configure the built-in ATA (Analog Telephone Adapter) on ONTs (Optical Network Terminals), they frequently claim that running a software-based softphone on a desktop or mobile device is impossible with the current setup.
In reality, the ONT separates voice and internet traffic and forwards data to BSNL’s backend servers using two separate VLAN IDs (Virtual Local Area Networks). One VLAN is dedicated exclusively to internet traffic and routes directly to either BSNL's internal DNS servers or public DNS servers that resolve web addresses to IP addresses. This internet VLAN ID depends on your local franchise; I have outlined the steps to retrieve yours in the guide below.
The second VLAN ID is dedicated to voice traffic. This also varies depending on your local BSNL headquarters, but the retrieval process is covered in the procedure as well. Voice VLAN traffic travels directly to BSNL’s internal servers that handle trunk dialing and bridge calls into the public phone network. Because voice packets travel straight to the trunk servers over fiber, we would theoretically expect lower latency and crystal-clear audio quality—though in practice, I observed slightly higher latency on fiber voice compared to a standard mobile network.
To establish a successful connection, your softphone must communicate directly with BSNL’s internal voice DNS servers rather than a public DNS server. I noticed that many online tutorials covering this setup unknowingly route voice traffic through the public DNS. However, Karnataka BSNL servers are specifically configured to reject packets originating from the public DNS server, they must originate directly from the ONT interface itself. Further more the BSNL VOIP servers cannot be indexed by public DNS Servers as it is Completely inside BSNL's firewall and no other Public entity has access to it. Ultimately, we must ensure the ONT correctly identifies and segregates voice and internet traffic to route each stream into its respective VLAN. The Below Flow chart is AI generated, I have Verified them but some errors may persist.
SIP Traffic Routing Flowchart
Old Flowchart
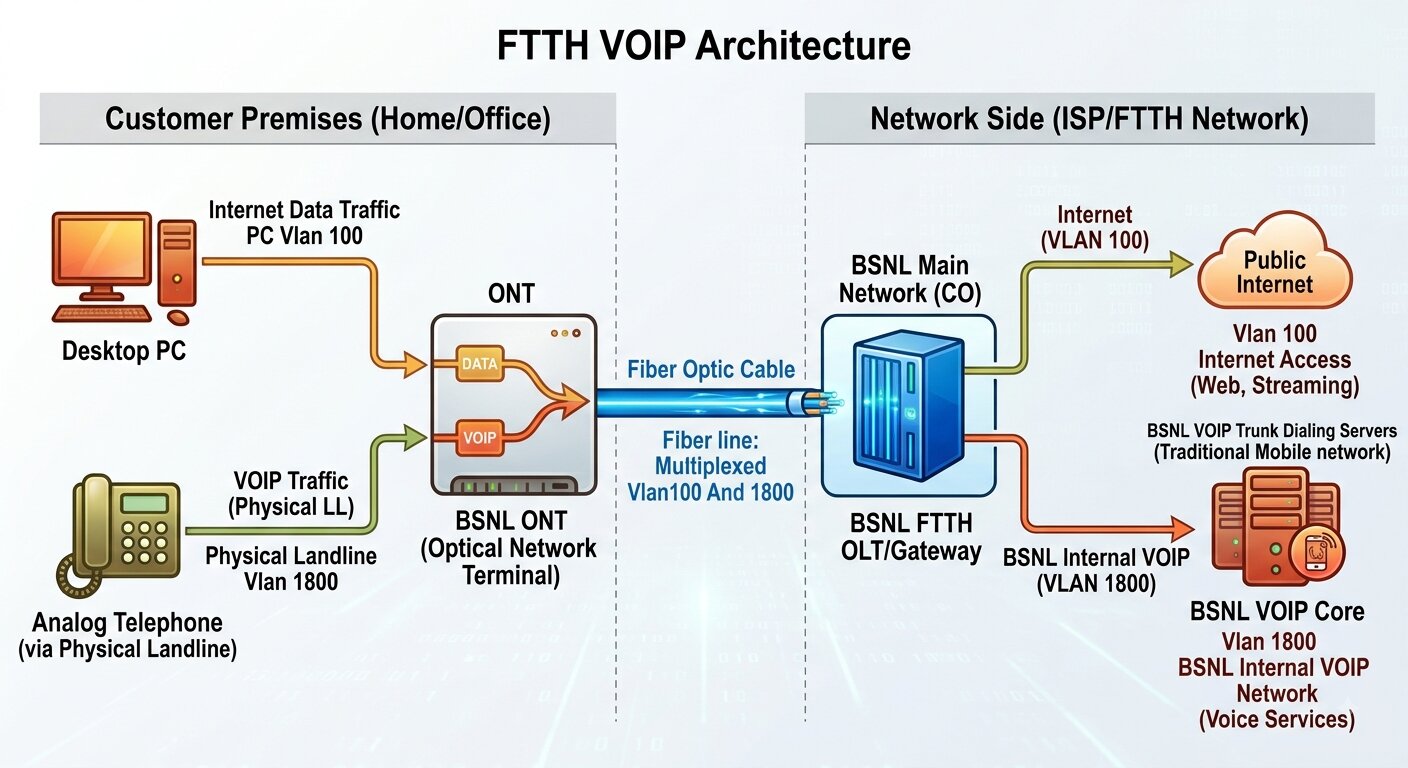 🔍 Click to Expand Flowchart
New Flowchart
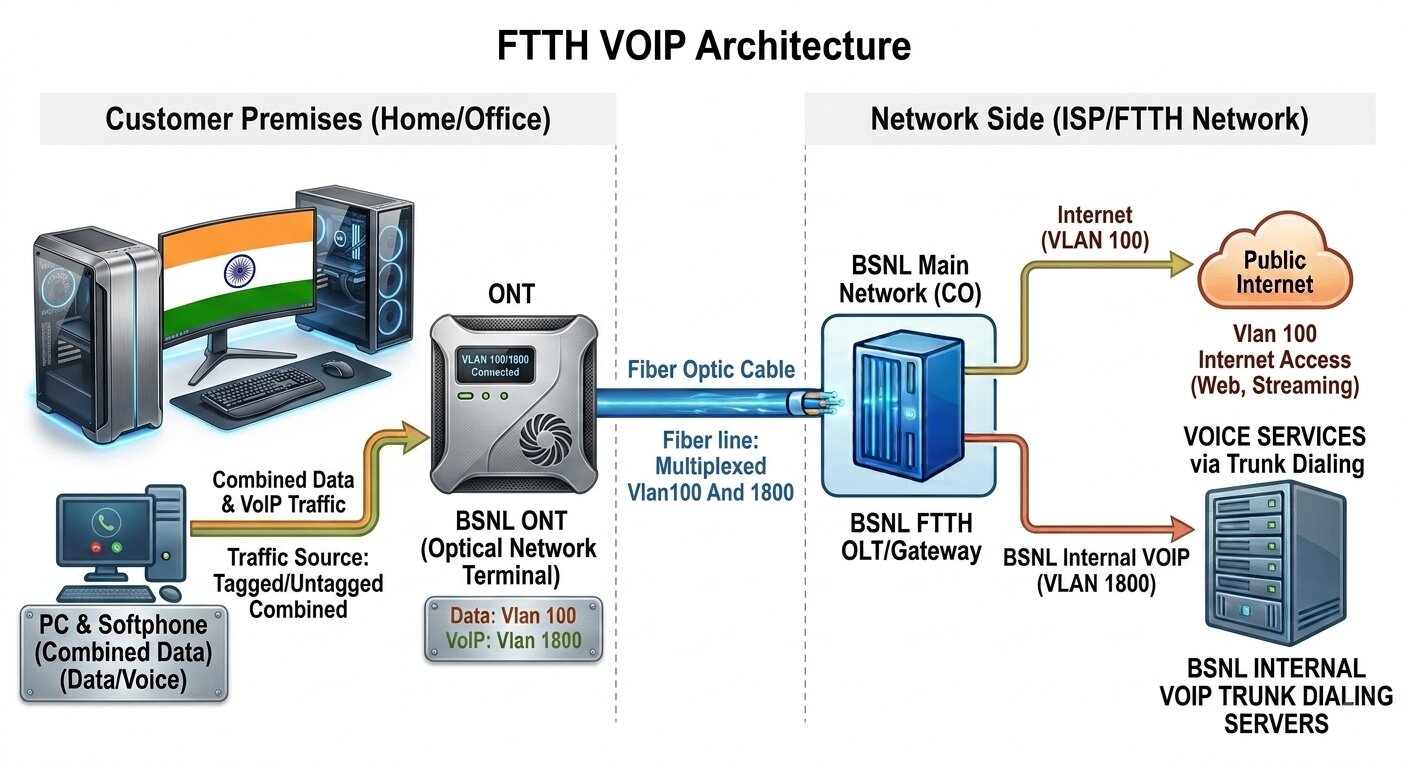 🔍 Click to Expand Flowchart
VLAN Binding & Private DNS
Voice traffic is separated from regular internet traffic using a distinct Virtual LAN ID (typically VLAN 1800's for Karnataka). The ONT receives a private IP address within BSNL’s internal SIP subnet.
SIP Authentication
Your username is your landline number followed by your assigned domain. For authentication, you must use the exact domain name assigned by BSNL, or the connection will fail. You will also need your SIP account password (we will cover how to locate both your domain details and password later in this guide).
Codec & Transport
BSNL's IMS architecture relies on standard codecs like G.711u / G.711a / G729 / G722 for uncompressed voice quality, routed using UDP over port 5060. You can also Experiment with different codecs for Better result. But My setup uses the following codecs and I have faced no issues.
2. Step-by-Step Configuration Guide
Follow these steps carefully to bridge your ONT's VoIP VLAN with your internal LAN and configure your softphone application. Keep in mind the settings vary with Each model of ONT but the overall Procedure remains the same.
Step 1: Logging in and Backing up the ONT
To login to your ONT you need the IP address of the ONT. It is usually 192.168.1.1 . If you do not know the Ip address, You have to connect your laptop Directly to the ONT with no Devices/nodes in between and then in Terminal/CMD you can use "ipconfig" command for Windows and "ip route show default" for unix based systems. Then the gateway in most cases is your ONT Login address. Below I have listed the default login details for DG-GR6011. Many times the IP address and Login details will be printed under the ONT. Else You can contact your BSNL Technician for the details.
- IP Address:
192.168.3.1 - Username: admin
- Password: stdONU101
It is Possible that the default Password might be changed by your Technician.
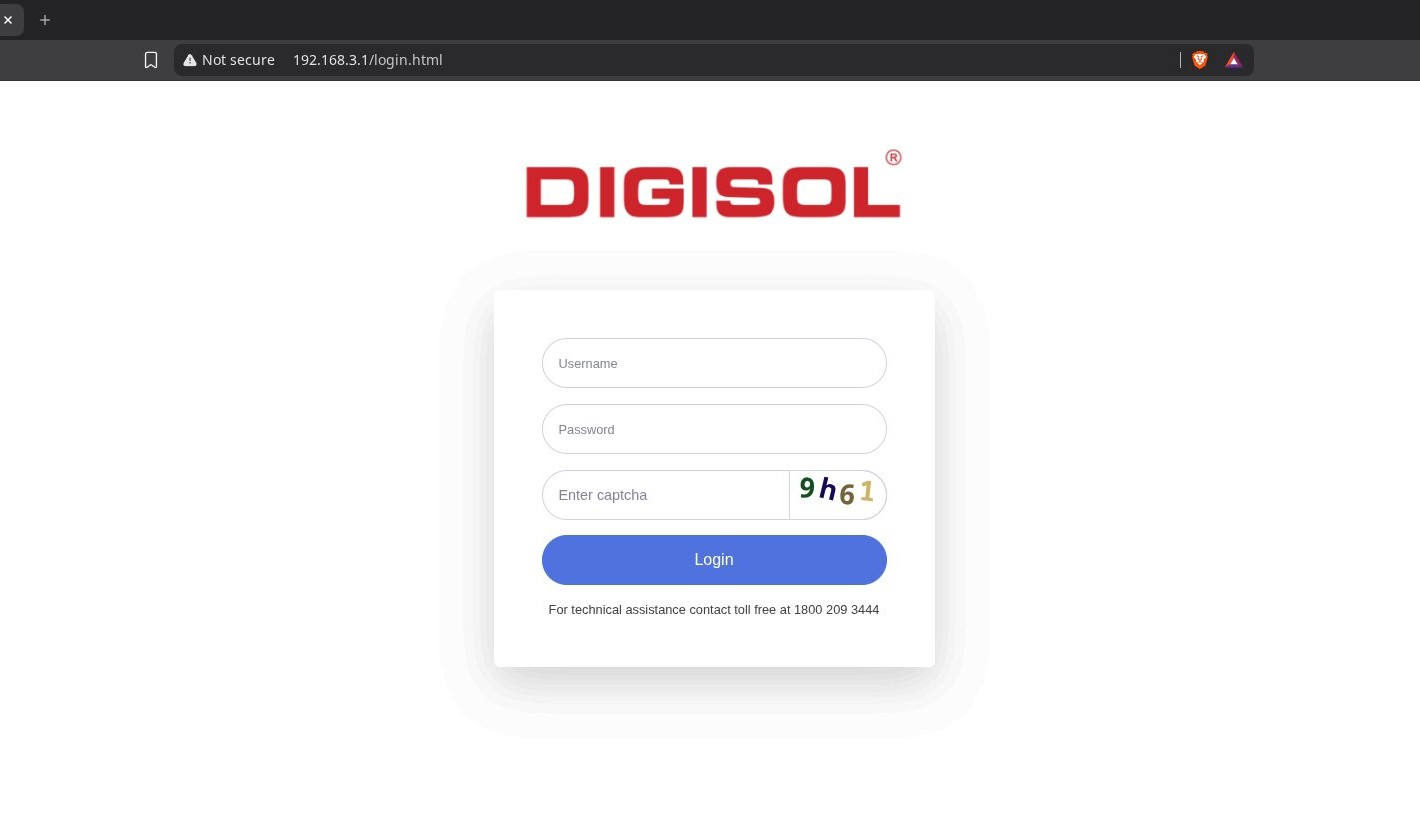
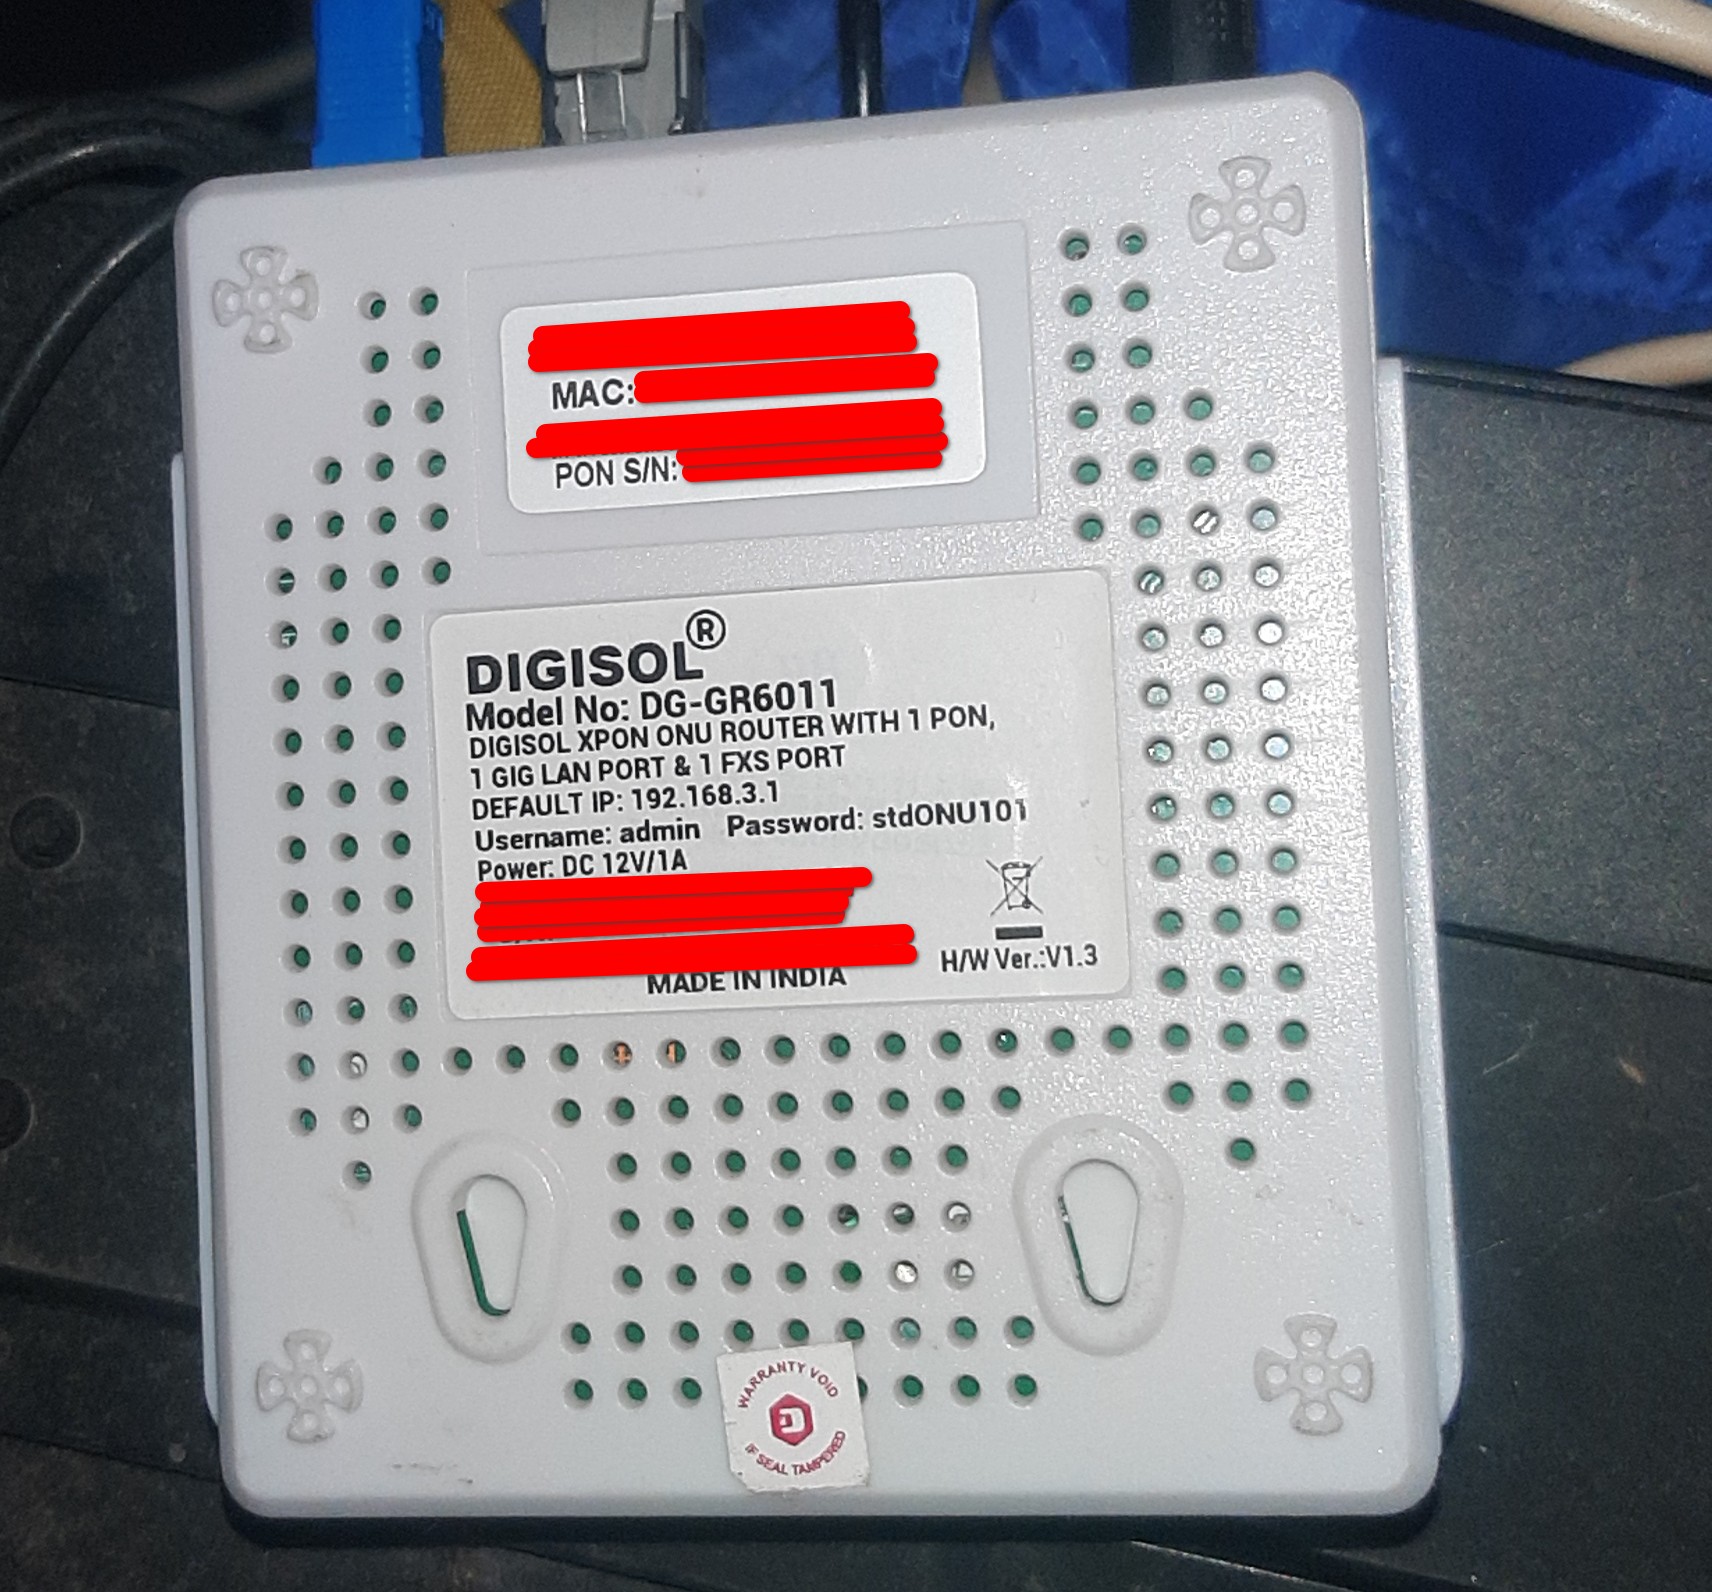 🔍 Click to Expand
Step 2: Backup ONT and Notedown VOIP Credentials
After Sucessful login, Go to Section such as System / Maintenence / backup Etc. And find the Option to Download the XML file of current Configuration. Make sure to download multiple copies just to be safe. My option looks like this as shown in the picture.
Search for VOIP Section. Mine is located under applications. Then note down the Following Credentials. (If you cannot find them you can also ask your Technician for these Details.)
- Primary SIP Register Address: xxx.ftth.xxx.bsnl.in
- Port: (usually) 5060
- Number: +91xxxxxxxxxx
- Username / User Account: +91xxxxxxxxxx (Mine was my number but yours may vary.)
(Is also Correct +91xxxxxxxxxx@xxx.ftth.xxx.bsnl.in) - Password: xxxxxxx
- Codec & Dialplan G711-u / G711-a (Optional)
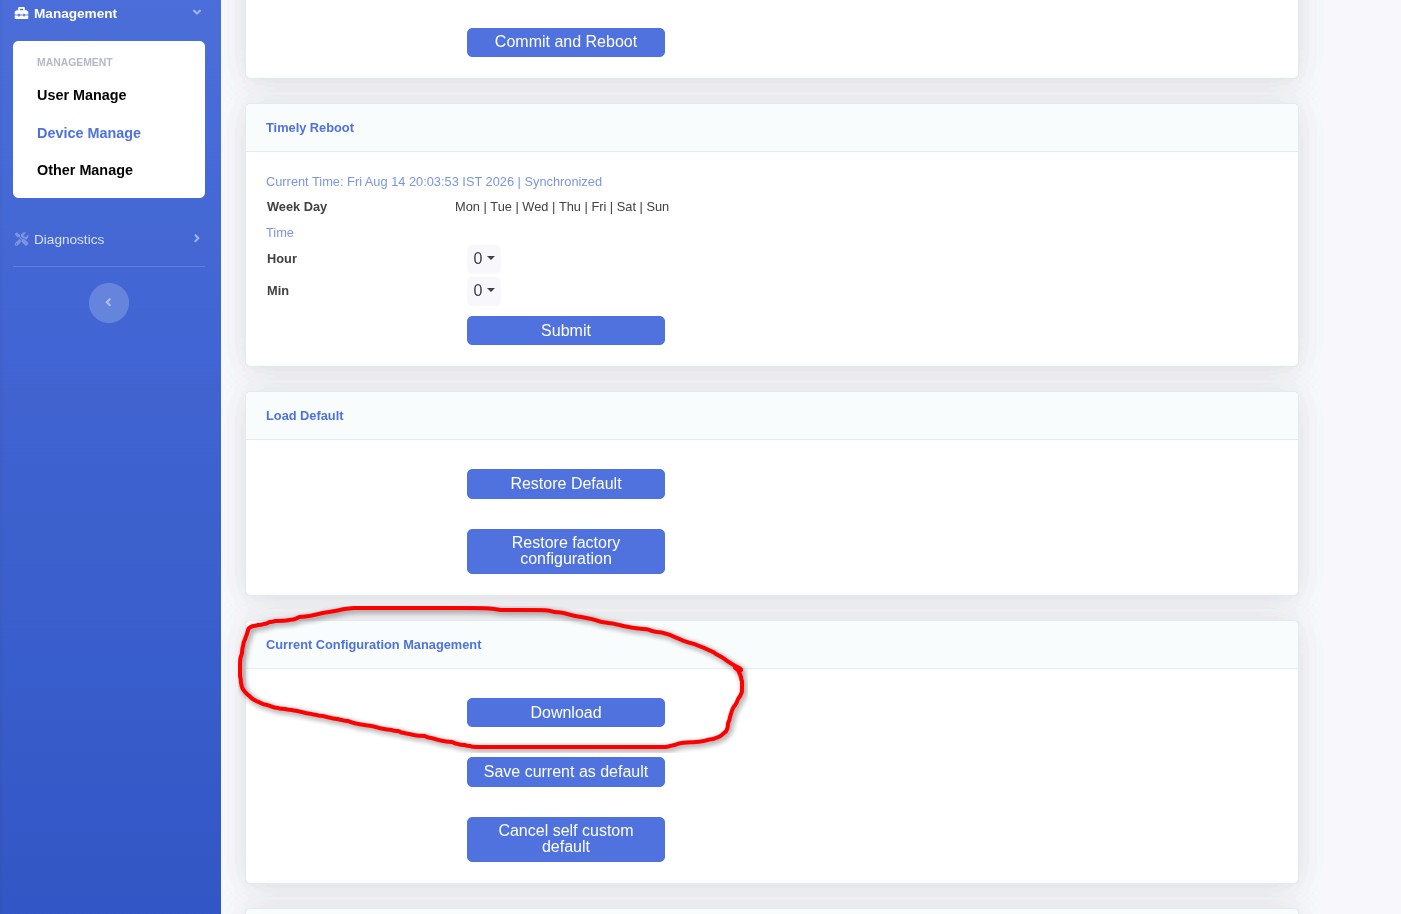
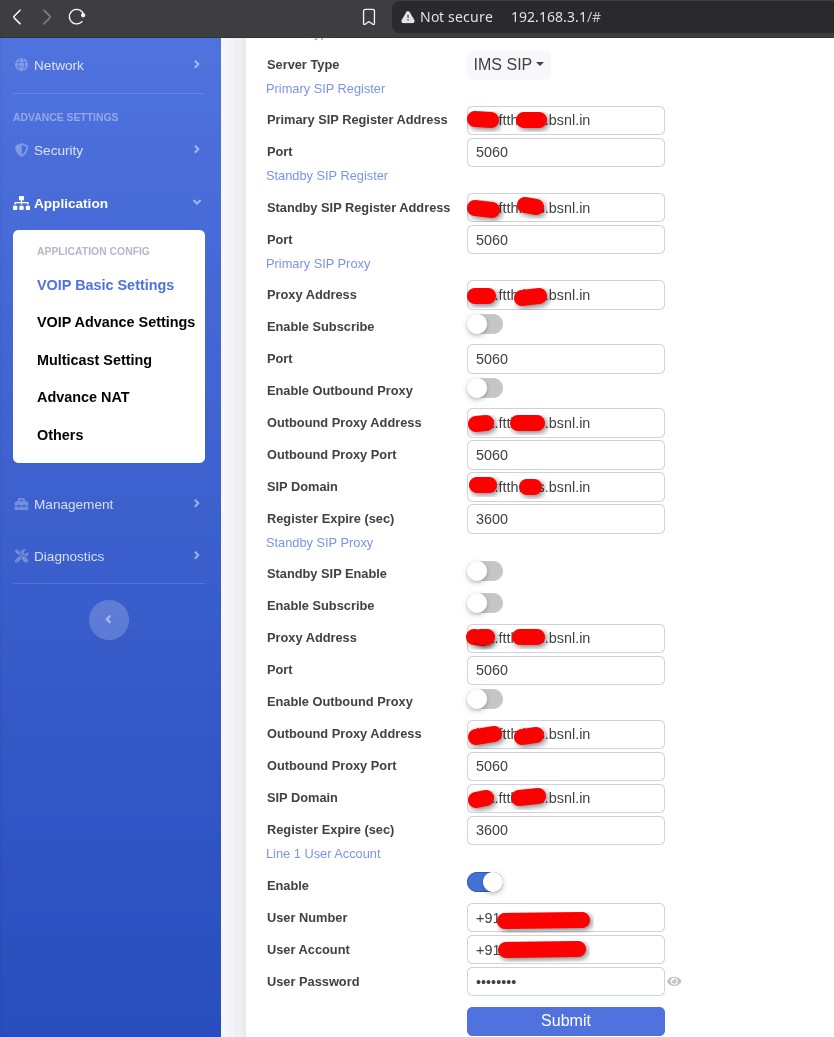 🔍 Click to Expand
Step 3: WAN Interface & Obtaining IP address of VOIP DNS
Go to the WAN settings Page on your ONT and select the VOIP profile. Then Change the service Mode from VOIP to other (or anything Not related to TR69/Internet/VOIP) Then Enable NAT and Keep the VLAN settings as the same. By doing this Procedure We are essentially Telling the ONT that Do not Forward the Voice packets to Physical RJ11 Jack on the ONT. Therefore by Default it is Routed through the LAN/Wifi chip.
This feature might not be present in older routers but most of the newer router have this feature. We Essentially need to Ping the SIP address Obtained in Previous step (xxx.ftth.xxx.bsnl.in). This Ping cannot originate from a PC as of now, As any traffic from any other Device other than ONT is routed through Internet WAN Interface. As I Explained Eariler, The VOIP Servers are Internal and Ony Respond if the Request goes through the correct VLAN.
Now to Find the Actual IP address of the VOIP server, Head to the network Diagnostics Section and Find the option to do a Ping test. There Enter the SIP address then Select the WAN Interface as "Other" (We changed it From VOIP to Other). As shown in the Picture. Then do a Ping test. Note down the IP address.
In my case It did not allow to do the Ping test with the "Other" Wan Interface. So I changed the WAN Interface back to VOIP and Did the Ping test noted down the IP address and then Switch it back to "Other" WAN Interface..
I have Redacted My IP address and Domain as it changes for each region, It is Possible to Get a Approximate Location from them.
Here We observe that the Ip address is of 10.xxx.xxx.xxx Series. If you got this address then you are on the correct path. This address indicates to us that, The VOIP server is located inside the Greater network of BSNL but Not accessible through the Outside Web. Although our Devices can speak with 2 DNS server for each different requests. I found Entering IP address is the better method, Rather than Bothering with the DNS systems in individual devices.
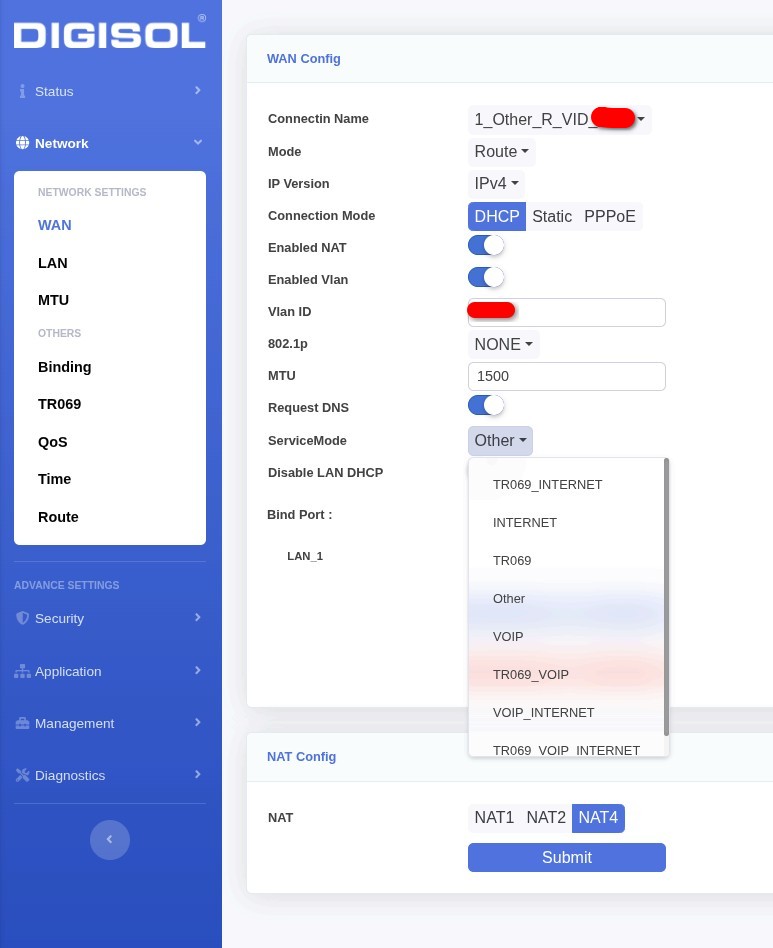
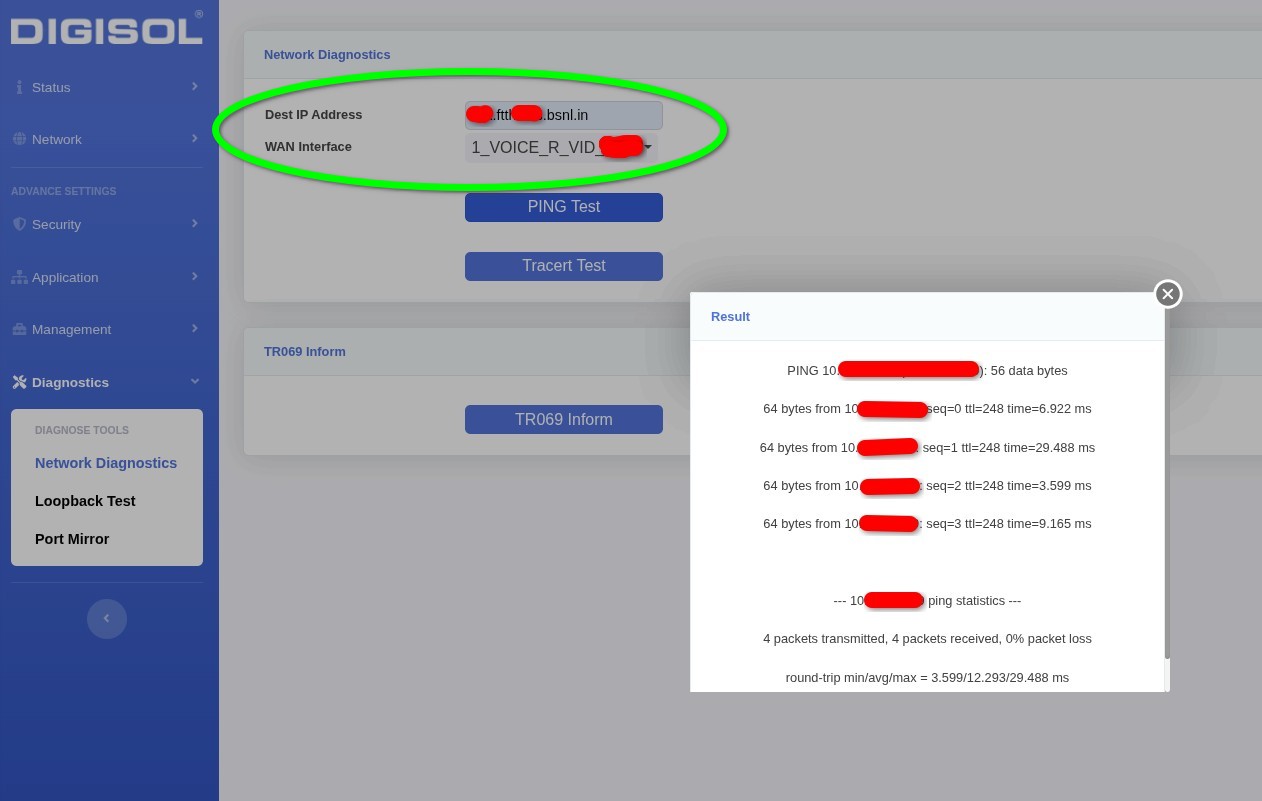 🔍 Click to Expand
Step 4: VOIP Gateway & Static Routing
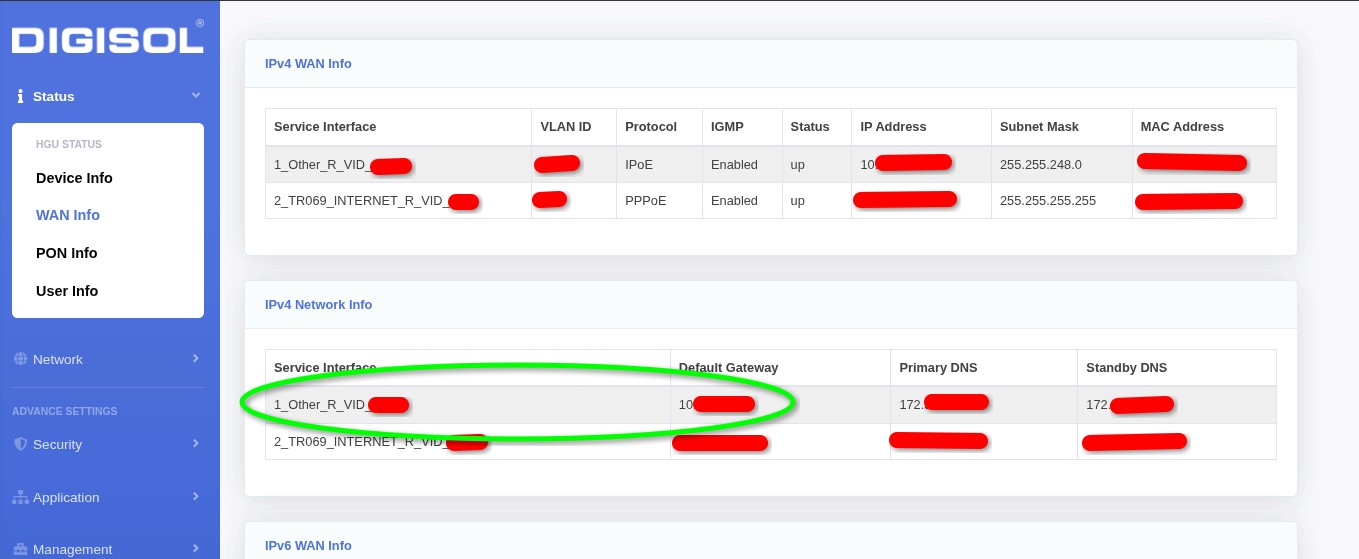
We also Require the Gateway Ip address for VOIP WAN Interface. It can be obtained under status, WAN Info. I have Redacted many Things in the picture, but the Green circle is the Gateway IP address. Note down the Gateway IP address. You can also see the different DNS servers used by BSNL for Internal VOIP Related Requests. We do not need those right now.
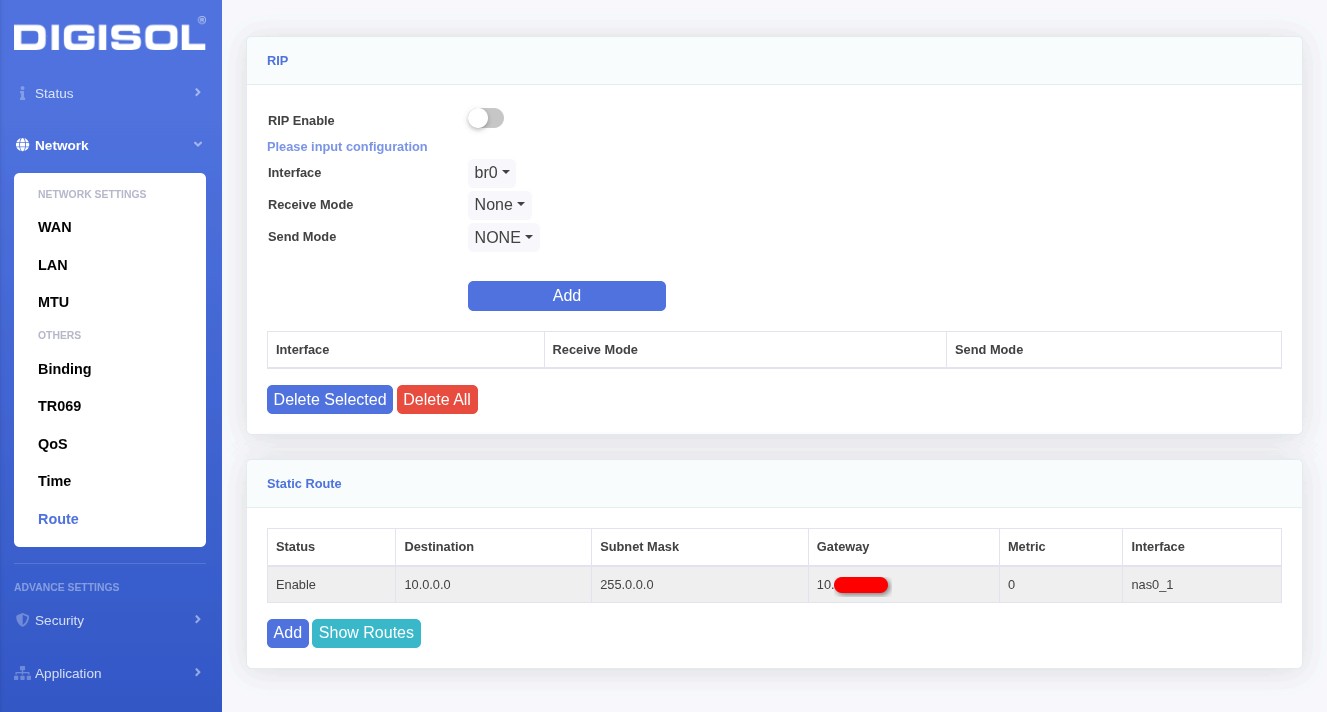
We next need to Establish a static Routing Rule saying all the Traffic Heading to 10.xxx.xxx.xxx Must go through Other WAN Interface, Rest of the Traffic can head to Internet WAN Interface.
This can be done by going to the Routing/ Static Routing Section under Network tab, Then click on add new route and fill the details as below.
- Destination: 10.0.0.0
- Subnet Mask: 255.0.0.0
- Gateway: 10.xxx.xxx.xxx (Enter the Gateway You Noted down)
- Metric: 0 (Only on some Model of ONTs)
- Interface: Other (Select the VOIP WAN Interface that We changed to "Other")
Keep in mind after doing this Implementation, You cannot Run anything in your Home network under the Ip Series of 10.xxx.xxx.xxx as all the Requests will be forwarded to BSNL's Upper stage Routers, which do not know your Local Devices. You can use different subnets under 192.xxx.xxx.xxx Ip series.
 🔍 Click to Expand
Step 5: Setting up Different Softphone Providers.
We have a Lot of Softphone Providers, Some are Open Source others are closed source.I use MicroSIP for Windows, Baresip for Linux and Linphone for Mobile. These are the ones that meet my needs and work great with this Guide. You can also use Zoiper, Asterix, etc. Many of them are Open source Projects, If you have the money to spare, I kindly request you to donate to these kind of projects and If you like the products they are offering.
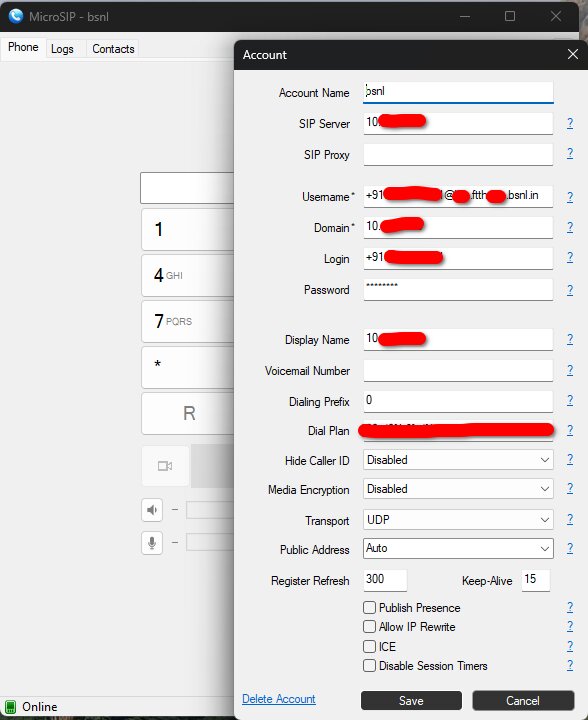
The below are parameters You have to Enter in Microsip to establish a Softphone. In the Account name section it is important to include the Domain name with the username as shown below, As the VOIP servers verify the Entire username with Domain name. If there is 2 fields Like as shown here, The full Username must be entered only for the Field Username for Login just the Mobile number is enough. Then no proxy is Required, but for Some Softphones You may have to enter the proxy, In that case you can enter the same IP address you Obtained during Ping test. For the Domain field, You have to enter the Server IP address you obtained during the PING test. Then Enter your password, For Trasnport use UDP and for Codec G711-u.
- SIP Serve:r 10.xxx.xxx.xxx (IP address obtained during Ping test)
- Username: +91xxxxxxxxxx@xxx.ftth.xxx.bsnl.in (This format must be followed)
- Domain: 10.xxx.xxx.xxx (IP address obtained during Ping test)
- Login: +91xxxxxxxxxx (Just the Landline number or just the Username without domain.)
- Password: xxxxxxxx (As Obtained from ONT / Technician).
- Proxy / Outbound: 10.xxx.xxx.xxx (IP address obtained during Ping test) (only Required for Some Softphones.)
Thats it By this time you must have a fully functioning FTTH SIP based Soft Landline. Some Softphones have different so you have to change some of the entered data to get it to work. Keep in mind after doing this Implementation, You cannot Run anything in your Home network under the Ip Series of 10.xxx.xxx.xxx as all the Requests will be forwarded to BSNL's Upper stage Routers, which do not know your Local Devices. You can use different subnets under 192.xxx.xxx.xxx Ip series.
 🔍 Click to Expand